Saturday, December 19, 2009

Beginnings of a Walnut Wall Cabinet


Knowing now, how big my cabinet is, it is shocking to see how big the planks were that I started with.  These were the black walnut planks that Byron and I came back with from Vancouver after a day of adventure.  We thought we had done well, and in some regards we did, but generally lumber yard selection is something that I still look forward to learning much more about.

As I explained in the previous post, but for those who heeded the warning and chose to skip it, I came to the decision that a wall cabinet would be my first piece.  Wood selection came full circle and I decided to use the walnut originally slotted to be my hall table.

Once those decisions were made, and knowing I only had four and a half weeks until Christmas, progress was crucial and mocking-up, templating and selection of graphics went quickly.

I moved on to doweling the carcass first, as the door was to be a frame and panel and wouldn't impose anything specific in terms of carcass shape or size.  This way basically you make a door to fit the carcass instead of vice-versa.


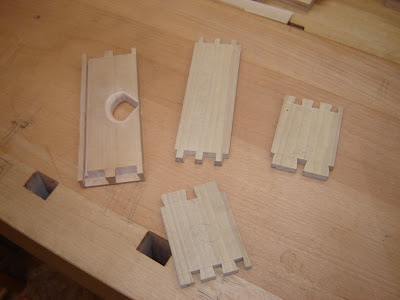
Next was the process of mocking-up the interior partitions and drawers as seen below.
 
 Some hinge making...  The hinges must be made early on so that the mortises that house the hinges can be cut prior to gluing up the carcass.

 Pressure buttons and leveler holes are also drilled at this time.  Much like the flipper-floppers we used on our wabi-sabis, the pressure button shown below is intended to secure the door when it is shut.  It's a cool little mechanical device made from a screw, a spring and a little wooden doughnut.

I'll continue to play catch-up over the holidays here.  I have lots more photos right up to where the cabinet left off for Christmas!

Wood selection kills the hall table

Warning: This is a long boring story and is only intended for those who have a keen interest in the psychological turmoil of fine woodworking.  Please feel free to skip to the next post.

The beginnings of this cabinet were a long and drawn out process that began as an idea for a hall table.  After purchasing what I thought was nice black walnut that failed to give me a  nice table top I began searching high and low through the wood room for something that would make a suitable replacement.  I scrubbed plank after plank of everything from french walnut, to arbutus, western maple, hard maple, curly sycamore, chinese elm and finally found a piece of red elm that would provide me with not only the size I needed but also the color and grain graphics that were to be crucial if the table was going to be doable. 


Content with my selection I began milling up the plank, deciding on the placement of each piece I needed from the board.  As I got further into the wood, with thickness being at a critical point, I made a pass through the thickness planer and uncovered an imperfection in what was to be my table-top.  To some it seemed like a feature and many said it added character and that "it's wood!, not laminate"  but I couldn't get past the fact that it looked like a stain.  Especially in the context of a table top, I couldn't live with it and thus was once again left with no suitable wood, and now out 3 or 4 more days.  Determined I went back on the hunt for a piece but soon realized that it wasn't meant to be.  I was discouraged, frustrated and had stopped having fun.  Something had to give and so it did.  I asked Robert if he had a few minutes to talk and we came to the conclusion that maybe for now, the table couldn't be done.  I project cannot be forced onto a piece of wood if the wood isn't offering what you need.  I shared with him a sketch I had put together of a wall cabinet that although simple would at least get me back on track, working and having fun.  I walked out feeling much better, not having given up on the table but simply having delayed it for now.

I felt like I had wasted a week, having accomplished nothing but with the help of Robert and all those around, son realized that wood selection is a huge part of the process, equal to craftsmanship in terms of importance and sometimes it requires more time than planned to find just the right piece of wood.

Below is a mock-up of what the table would have looked like and perhaps one day will look like...

Saturday, December 12, 2009

The Finishing of Wabi-Sabi

Wow!  I am verging on failure when it comes to the mission I stated at the top of this here blog.  As I explained I always struggle with keeping up to date with such thing.  I am however going to make up for it in the next few days and try to bring everything up to speed.  In my defense, our internet connection was down for a little over a week, but I realize that that is not much of a defense.

So since the last post we have finished our Wabi-Sabi Cabinets.  I was thrilled with how mine turned out.  Throughout the process I was convinced that little mistakes would surely amount to a poor finished product but I was surprised at how quickly such things are forgotten and I was left with a little piece that summed up everything I'd learned and showed how far I had come.

Ok so get to some pictures already!

 Fitting the drawer.  We've learned a technique that JK referred to as "let-go" in which you pull out the drawer and it grabs just a little at the very end which stops it.  Basically the drawer pocket is a wee bit bigger at the back than the front and the drawer matches so when you pull the drawer out the let-go kicks in and it feels really nice and smooth.  I made my finger-pull hole nice and big for my fat thumbs.

 The red cedar drawer bottom slides in from the back into grooves cut in the sides and front.


The shelf is held up by what is referred to as consoles.  We carved these out of some pear wood because it is nice to carve.

The back panel is a floating panel held in a frame and then fitted to the back of the cabinet.  I made the wall hangers from brass stock and once the door was fit and installed, it was done!


Gotta love the "character" on the inside of the door.  We started with a big piece off of a plank and what we found inside was what we worked with.  This picture shows the book-matched panel nicely.
 
My first real project is well under way and I will get caught up on blogging that asap!

Sunday, November 1, 2009

Hallowe'en and Cliff Gilker Park


Hallowe'en brought a visit from a cute little lady bug!

 
And a monkey too!! ( Steve looks like he was amused...even if they weren't!)


Hallowe'en would have been James Krenov's birthday so Robert decided to have a tribute to him.   The shop was full of people who came to share in hearing Robert speak and see a slide show of JK's work.  We all wrote a note on a piece of yellow cedar, made a shaving and put it in a box that will be sealed up and burnt down at the beach.  The plane we used to make the shavings was made by JK in 1960, then given to Michael Burns when he took over as the teacher at the College of the Redwoods.  When Robert founded Inside Passage in 2003 it was passed on to him...pretty sweet!


Today we went for a walk in CLiff Gilker park, just across the highway.  Our neighbour showed us the beautiful trails that wind through the trees and cross over numerous creeks and rivers.


This week Ian Godfrey is guest-teaching as we finish our cabinets and begin the prep work for our first projects.  Everyone is very excited to be done with the poplar and get onto creating our first pieces.

Dovetails!

So we finally tackled one of the skills that I had most been anticipating...dovetails.  I had tried in the past, with very little success and then given in to frustration.  Robert's method, however, has me excited and feeling like I will indeed be able to include some beautiful hand-cut dovetails in the pieces I build.  Many students are considering burning their completed cabinets as sort of a ritual but I'm thinking that I will be throwing in the book I bought, written by one Rob Cosman, on cutting dovetails.  That will be satisfying enough for me.

The front, sides and back of my drawer.  We did through dovetails on the back corners and half-blind or half-lap dovetails on the front so that the drawer front isn't interrupted by visible joinery.


The slot that will hold the drawer bottom has been rabbeted and the pull has been cut, carved and filed to accept a curious finger.

 
The drawer, dryfit, awaiting glue, a bottom and then on to being fit in the cabinet.


 These were some practice dovetails in ash and maple.  The ash is a little harder than the poplar sides we used on the drawers.  The joint is harder to get right because there is less compression in the harder ash so it doesn't just squeeze to gether.  I was really pleased with how this one turned out.  I plan on continuing to cut a joint here and there when I have a chance because it is definitely something that gets better with practice.


Sunday, October 18, 2009

Rya having the giggles...


While a good part of my time out here has been spent at school I still always look forward to Sundays and time spent with Mylene and Rya.  Mylene captured some footage of our giggles at bath time tonight.  This was the first prolonged giggle session that she's had (at least with Daddy)!

Watch her in action!

Monday, October 12, 2009

Beginnings of Wabi Sabi Cabinet

This year Robert decided to do things a little differently than in the past.  After discussing it with JK over the summer he decided that instead of just doing random exercises we would build a little poplar cabinet, and in the process, learn  most of what we will need for our first project.  It has been referred to as our Wabi-Sabi cabinet, meaning, "beauty in imperfections" in Japanese.


The piece of wood we began with was roughly 13" wide, 18" long and 3" thick.  We began by flattening one face before re-sawing it into thinner "slices".  The first piece became our door as you can see in the first picture.

The door is coopered, and will be concave when viewed from the front.  On order to do this we began by cutting our piece into staves and the edge jointing them at an angle to produce the beginning of our curve.  This was done with my jointer plane, which produces perfectly straight edges to glue together.


After some shaping using the coopering plane, the door begins to take shape.  It is tapered slightly from the thicker hinge side across to the other side.  It gives the door a more delicate feel than if the doors thickness was consistent across.


We used negative templates of our pieces in order to select the grain graphics that we wanted for each piece.


The carcass of our cabinet is all joined with dowels.  We started with a simple doweling jig in order to line up our holes.


The pieces went together like magic. Still lots to do though before we glue it up.


Much more to come this week as we have to make hinges, shape our pieces, fit our door, put in our partition, make our drawer and then glue it all together....eventually.

Planes and other tools

I've finished all of my planes and they have been working great.   Each one has it's own purpose and when perfectly set-up are a lot of fun to use.

This first one here is a polishing plane made from Mesquite, with an African Blackwood cross pin.


This one is a coopering plane.  It has a curved bottom for hollowing out inside curves on doors and such.  It is made from Jatoba with a Maple cross pin.


This is my jointer plane.  It's made from Maple with a Kwila pin and an applied sole of Kempas.


Last but certainly not least, the first plane we made, our smoother, from Jatoba with a Kwila cross pin.
 

In between other things sometimes we have a little extra time so make things like my plane adjustment hammer from Ebony and a marking knife from Maple.
 

This is a mallet that I'm working on for our Secret Santa.  I know it's early but better to do it now than when I'm trying to get my first piece done!


Friday, September 25, 2009

Speedy Gonzalez, James Krenov and Wooden Planes


Our first couple weeks at the school have seen us all experience a lot of firsts...first real work bench, first time sharpening to a razor's edge, first time making a wooden plane and most importantly, first shavings with our new planes!  It is a wonderful feeling, to make a tool with as much care and precision as you possess and then to see it carve off a beautifully thin, "full width, full length" shaving that gently floats to the floor.  When it's really thin Robert exclaims something like, "That's less than half a thou!".

On our first day we were asked to introduce ourselves and say a little about why we were here.  I said that I was here to learn how to slow down and enjoy the process of doing my work, ahead of thinking about the product.  Three weeks in I'm quite pleased with the results I've achieved but I don't think I've slowed down much, if at all.  After the last few years I'm hardwired to work efficiently and I'm struggling with the pace.  I take solace however in a quote I found by James Krenov.  He said, " Good work makes its own pace."  I look forward to further working on this, especially as the tasks we are given become that much more complex and challenging.


I was not familiar with James Krenov until I looked into coming to this school and discovered that it was all based on his teaching and his ideas.  While reading his first book, A Cabinet Maker's Notebook  I really gained an appreciation for wood as more than just another material and for woodworking as much more than just building with wood.  He taught that in order to be a craftsman in the true sense of the word, you had to be connected to the wood and work with your heart, your hands and your eyes.  Sadly, on September 10th which was our third day of school, he passed away.  It was really special to be at the school and feel connected to the "legend" as Robert Van Norman, who is our teacher and the founder of the school has enjoyed JK as a friend and mentor for twenty or so years.  It is really special to be part of the school that as Robert explains, Krenov felt was his legacy.

I'm going to attach a bunch of photos of various things such as the making of our smoothing plane, our jointing plane and our coopering plane.   We have also done an exercise with grain graphics and the shaping of a "gumby" leg.  For now I will spare you too many details but perhaps will get into it more later on.


The first two here are my smoother place in various stages of construction.  The third is more or less complete.   It was made from Jatoba which is a really hard, stable wood; good for making planes.


This is the pieces that I cut to make my jointer plane ( light coloured Maple) and my coopering plane (darker, again Jatoba).  We shaped the cross pins for our planes (the part that holds the blade in) by hand with chisels and files.

Some Tibetan monks were doing a Mandala at a church in Davis Bay.  They create an incredibly intricate design out of very fine sand.  It takes a week to create and then they ceremoniously destroy it. It was a lesson in patience and process for all of us.


Our first lesson in grain graphics was amazing.  We started with a 4 by 4 piece of wood and n order to get the grain to cooperate with the curve of our leg we had to cut it out so that the end grain ran diagonally across the top.

 Then, when you cut out the concave shape to the leg, the grain is manipulated into following the shape.  Almost like magic, so simple but so cool!  Notice how in the first photo the grain curves upwards?  Then in the second, the grain has been altered to curve down along the shape of the leg....


Ok, goodnight.  I'll share more soon.